How to Install Vinyl Flooring in Steps
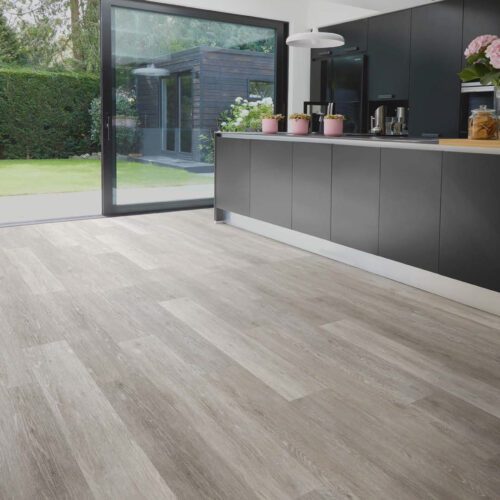
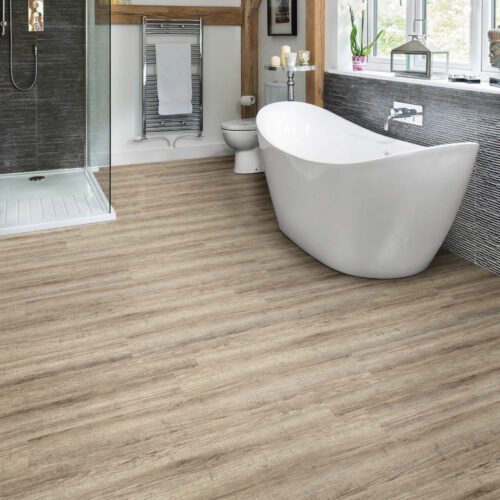
Vinyl flooring is a simple and cost-effective way to add a touch of style to any property. Easy to install over a concrete or wood base, they are stain- and scratch-resistant, low-maintenance, and affordable. If fitted correctly, they can provide decades of useful service.
A Floor supplies quality vinyl flooring solutions to domestic and commercial customers across the North West. For more information or free advice on the best vinyl flooring for you and your property, contact your local branch today.
Choose The Right Tools to Lay Vinyl Flooring
Whether you intend to install it on a concrete or wood subfloor, you need to make sure you have the right tools for the job. While the specifics might vary from job to job, these are some of the essentials you’ll need for any vinyl flooring project.
Tape measure: if you want to install vinyl flooring with a perfect fit, you’ll need to take accurate measurements of the room and your materials.
Utility knife: used for cutting through sheet vinyl to ensure an accurate fit.
Pencil: used for marking the floor and roll for precise measurements.
¼ inch spacers: these are laid along the perimeter wall and allow your vinyl flooring space to expand and contract with changes in temperature.
Putty knife and crowbar: used for removing skirting boards prior to the installation process.
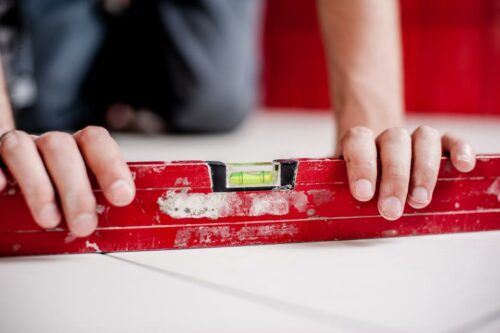
Carpenter’s level: used to confirm that the underfloor (whether concrete or wood) is level before installation and that your vinyl flooring is level following installation.
High-quality sheet vinyl flooring is available for immediate purchase from our online store.

Key Precautions to Take When Installing Vinyl Flooring
The key to a successful vinyl floor installation is to ensure you are properly prepared. This involves a few simple precautions you can take to avoid some common mistakes.
Test for moisture
A few days before you start, lay down a piece of scrap vinyl and seal it along each edge with a strip of duct tape. Leave it in the room for three days, and then go to remove it. If you can lift the tape easily, your underfloor might hold too much moisture to take a vinyl flooring installation.
Acclimatise your vinyl flooring
Vinyl floors expand and contract depending on the temperature of the room. Be sure to move your vinyl flooring to the room 48 hours before you plan to install it. This gives it a chance to acclimate to its surroundings.
Prepare your subfloor
A new vinyl floor is only as good as the subfloor beneath it. Whether you’re laying vinyl flooring over concrete, wood, or ceramics, you must ensure the subfloor is level, dry, and dust-free.
Make sure you have enough materials
Few things are more frustrating than having to stop midway through a vinyl floor installation because you’ve run out of vinyl or adhesive. Careful measurements and accurate calculations can help ensure you have the right amount of materials on hand to complete the project.
Step-by-Step Guide to Installing Sheet Vinyl Flooring on Concrete
A Floor provides vinyl flooring materials of the highest quality to our customers across the North West. With them, you can create an incredible new floor – one that looks and feels amazing. Follow our step-by-step guide to produce unbelievable results in your home or place of business.
1. Pry out the skirting boards
To get a wall-to-wall effect when fitting vinyl, it will need to be installed beneath the skirting board, which means these will have to be removed prior to installation. Using a utility knife, cut away any paint that might be covering the gap between the skirting board and the wall.
Insert a putty knife into the gap to cut away any adhesive. If your skirting boards are nailed in place, use a crowbar to loosen the nails. If you plan to reuse your existing skirting boards, take care when removing them so that they aren’t damaged.
2. Check the floor for cracks
Cracks in your concrete subfloor can compromise its stability, making it difficult to get the even finish you need. Use a floor levelling compound to fill in any cracks or divots, smoothing it out with a trowel or putty knife, depending on the size.
3. Ensure the subfloor is level
With any cracks filled, you need to ensure the subfloor is level. Take a carpenter’s level (or spirit level) and work your way across the subfloor taking measurements. If the subfloor rises or dips more than 5mm over a 3m distance, you will need to even it out.
4. Even out the subfloor
If you discover a rise in your concrete subfloor, the easiest way to remedy it is with a belt sander. Run this useful tool over the area in question, checking with a level at regular intervals until it is even. Don’t be too forceful with the sander – it’s better to take your time and get it right, rather than sand too hard and have to fill it back in again.
If you’ve discovered a dip in the subfloor, you need to raise it to the level of the rest of the floor. The best way to do this is with a levelling compound. This requires you to prime the concrete subfloor before applying the compound as a liquid. This automatically levels out to an even finish and must be allowed to dry before fitting your vinyl flooring.
5. Acclimate the sheet vinyl
Lay out the roll in the room you will be laying it in, this will let it acclimate to the temperature of the room. If you have underfloor heating, remember to turn it off 48 hours before installation.
6. Lay the sheet vinyl flooring out
The next day, lay out your vinyl floor roughly where it will be installed. If there are toilets, sinks or alcoves, you’ll want to cut around them. But remember to leave a 75mm space from the wall. Make sure you do this on all edges of the sheet vinyl.
Apply adhesive to the underside of the vinyl as per instructions. Some adhesives require you to coat the concrete floor as well as the back of the vinyl, while others only require one or the other, and some only advise along the perimeters and joining areas.
Always make sure you read your manufacturer’s instructions as many sheet vinyl have different requirements. Make sure the room is well-ventilated and that you wear face and eye protection. Spray your adhesive as advised and then press down firmly on the flooring. Again, your manufacturer’s instructions will advise you on the right length of time to hold in place whilst the adhesive gets to work.
7. Lastly, reinstall your skirting boards
Once the final edge has been fitted and allowed to set, you can reinstall your skirting boards.
How to Install Vinyl Flooring on a Wood Subfloor
Our step-by-step guide largely concerns itself with concrete floors, as these are the most common type of subfloor for laying sheet vinyl onto. Fitting vinyl to a wood subfloor follows much the same process but requires a little extra preparation.
With a wood subfloor, any rises or dips are most likely due to a warped floorboard. Remove the boards carefully and confirm if they have a bend or warp in the wood. If so, it will need to be replaced with a new floorboard before laying your vinyl.
It’s also important that there are no splinters on your wooden floor prior to installing a vinyl floor. These can interfere with the adhesive, making it more difficult to stick. Speaking of adhesives, be sure to choose one that is formulated to stick vinyl to wood.
How to Protect and Maintain Vinyl Flooring
For the most part vinyl flooring is made of durable and hard-wearing materials. If you install them properly and treat them with care, there is no reason that they shouldn’t last you for decades. Follow these simple tips to improve the longevity of your flooring.
DO read the manufacturer’s instructions that come with your vinyl floor. These will advise you of any particular chemicals or treatments that you should avoid when cleaning your vinyl.
DON’T use abrasive cleaning tools to clean your vinyl. These include scouring pads, scrubbing brushes, and even the beater bar on your vacuum cleaner. Any of these items can cause scratch damage to your floor.
DO use non-staining doormats. It’s always advisable to have a doormat wherever people come in from the outside. Wet shoes and vinyl floors can result in slipping accidents, not to mention marking your floor. When choosing a doormat, choose one without a rubber, cocoa, or latex backing, as these can cause discolouration.
DON’T drag heavy furniture across a vinyl floor. Instead, you should fit the legs of your furniture with furniture coasters to make the movement easier and prevent damaging your vinyl.
DO clean up any spills as soon as possible. Vinyl itself is waterproof, but spillages can stain the surface and are also a slip hazard for anyone entering the room.
Recommended Vinyl Flooring Products
As your local vinyl flooring experts, we know the best products for your installation. These are some of our most popular products, available for immediate purchase from our online store.
Sheet Vinyl Flooring
Sheet Vinyl Flooring is a popular solution for commercial settings, due to its non-slip surface and high durability. Sheet vinyl is ideal for high-risk environments, including schools, hospitals, office spaces and commercial kitchens.
We stock a range of products from Tarkett, whose selection of Safetread vinyl sheeting is used for commercial applications nationwide.
ADHESIVES AND SCREED
Preparing your subfloor with self-levelling compounds and the right adhesive for the job are just two ways to ensure the longevity of your new LVT flooring.
All of the above products, and more, are available from our online store. If you need professional advice on which products will work for you, call AFloor today. Visit our guide if you want to learn how to clean vinyl flooring or for more tips on repairs and keeping your vinyl flooring fresher for longer, visit our restoration guide for vinyl flooring.